Dinger's Aviation Pages
Modelling the Blackburn Skua and Roc
Notes for modellers
Click here for list of kits of the Blackburn Skua
Click here for list of kits of the Blackburn Roc
CLICK HERE FOR GENERAL CONFIGURATION PLANS FOR THE SKUA AND ROC
CLICK HERE FOR SKUA AND ROC COLOUR SCHEMES
If you are building a model of the Skua the following photos and diagrams will be of use.
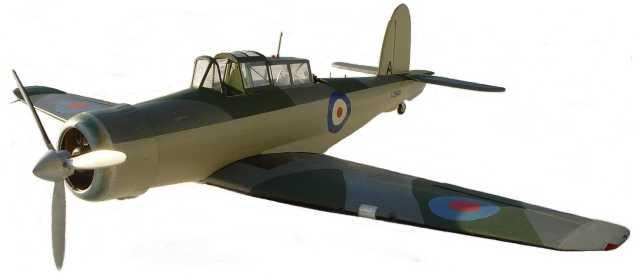
General Outline and Shape.
Underside of the Skua.
Click here for list of kits of the Blackburn Roc
CLICK HERE FOR GENERAL CONFIGURATION PLANS FOR THE SKUA AND ROC
CLICK HERE FOR SKUA AND ROC COLOUR SCHEMES
If you are building a model of the Skua the following photos and diagrams will be of use.
General Outline and Shape.
Underside of the Skua.
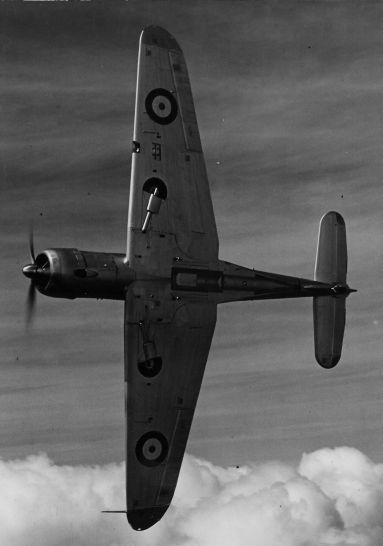
It's important to realise the Skua had a recess under the fuselage to hold a single bomb. That recess was well back, to the rear of the rearmost wing spar. Some sources claim that this recess could be covered by a plate when the Skua was not required to carry a bomb. The only possible photographic evidence for such a covering plate is a photo of L2870, crashed on the flight deck of HMS Courageous (reproduced on page 14 of Matt Willis' "Blackburn Skua and Roc"). That photo seems to show some sort of covering for the recess partly detached and hanging down. The bomb was provided with a hinged "crutch" to swing it clear of the prop in a dive-bombing attack (the crutch was removed when not required). Each side of the bomb recess had a small bomb bay covered by doors used to house smoke floats. Because of the way the fuselage sat on top of the wing the trailing edge of the wing was well below the fuselage and had to be mated to the wing with an extensive wing fillet to reduce interference drag. This gave the undersurface a very complex shape (not unlike the Supermarine Spitfire which also had extensive fillets). The Blackburn Roc did away with this complex shape, replacing it with a simple "flat bottom".

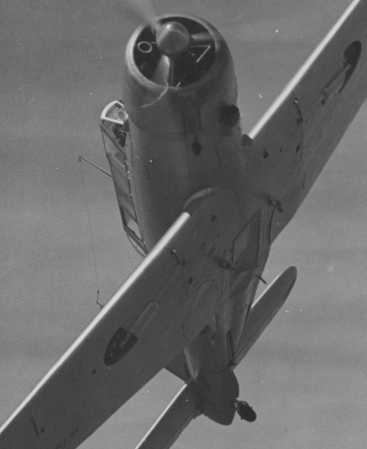
This view of the Skua illustrates the way the fuselage sits on top of the wing and then tapers towards the tail requiring large "fillets" to merge the two together with the underneath of the wings having to adopt a subtle "inverted gull" aspect near the roots.
Notice the slight kink in the trailing edge of the wing near the wing root.
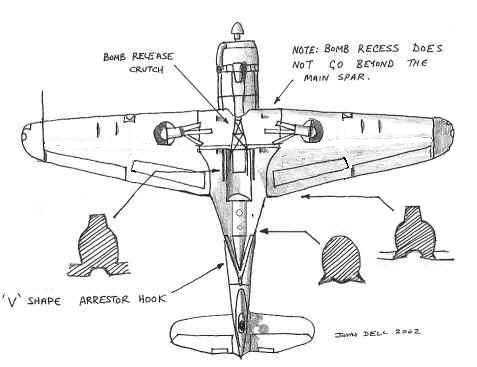
The above sketch shows the underside of the Skua. Note that the bomb recess is well aft and does not go forward of the rear wing spar. Also note the way the V frame arrestor hook sits inside the wing fillets. Skuas L2867 through to L2929 had landing lamps on both wings, the status of L2930 to L2932 is unknown, but certainly, from L2933 onwards Skuas only had a single lamp on the port wing.
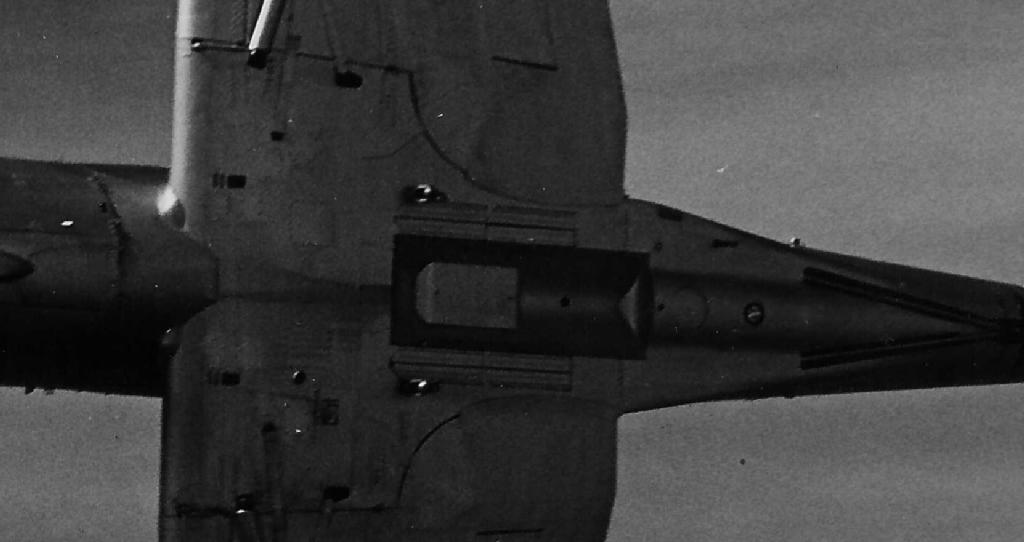
The bomb recess of the Blackburn Skua in close up. You can clearly see it has straight edges rather than the "bathtub" way it is represented on the Pavla (1/72 scale) and Special Hobby (1/48th scale) models. The bomb crutch is not fitted on this aircraft. Note the two small bomb-bays with doors that flanked it (for flares and smoke floats) and the "V" frame arrestor hook in its recess. Once released in the air, the hook could not be retracted again until the aircraft had landed.
Another view of the underside of a Skua.
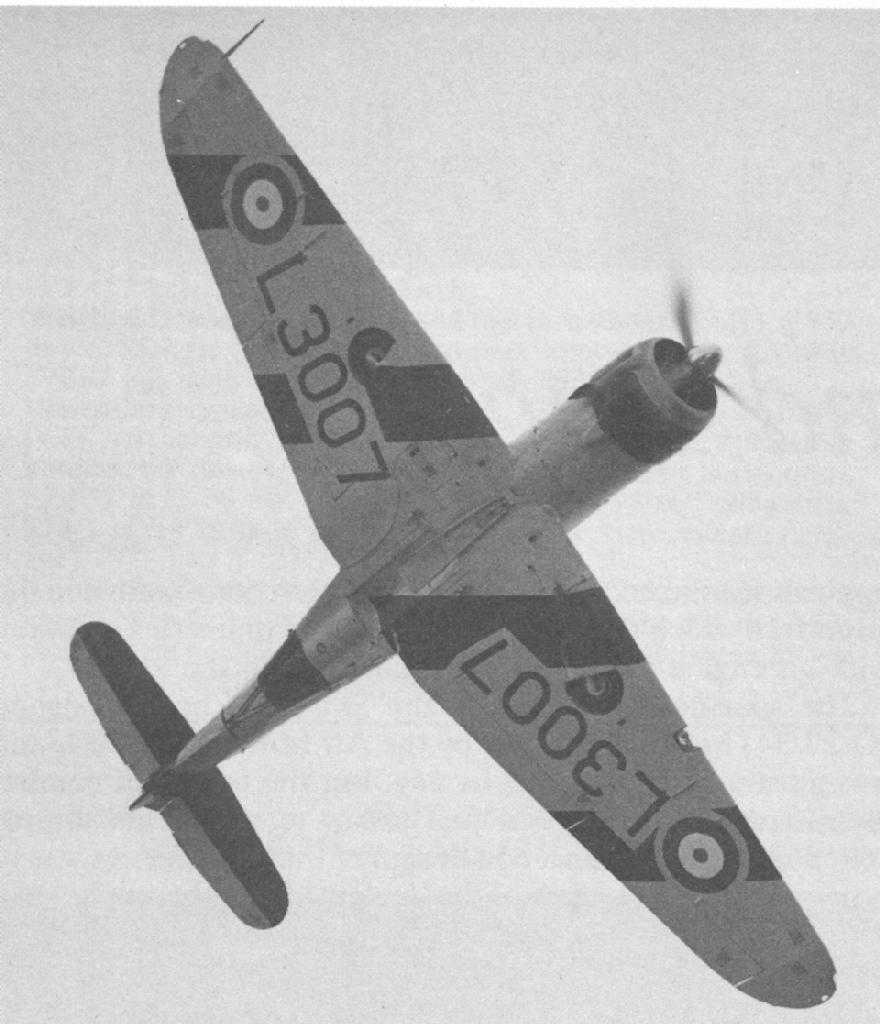
Halftone image of the underside of Skua L3007 in "tiger stripe" target-tug livery. Again you can see the recess for the bomb with its straight edges, and the curved section of the fuselage between the wing-fillets. This time the Skua has the bomb-crutch fitted. You can see the apex of the crutch attaches some distance behind the leading edge of the wing. Notice also the light showing through the hand-holds at the extreme tips of the wings. These would be extremely hard for a manufacturer to reproduce on any model kit, certainly not in 1/72 scale. If you build a 1/48 scale Skua or Roc you might want to try to reproduce them with a shallow nick in the wing-tips then spanned by some very thin stretched-sprue.
Flaps
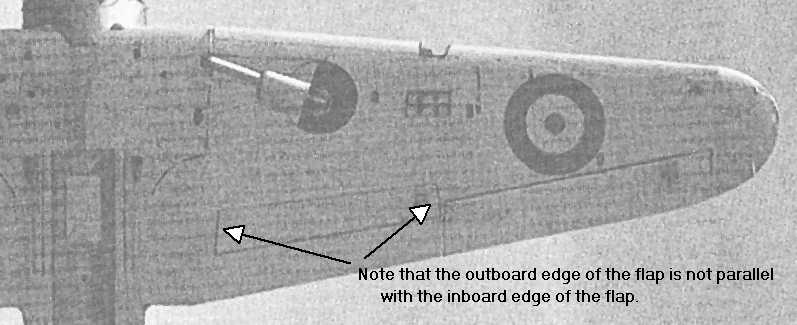
The Skua and Roc had "Zap" flaps which doubled as dive-brakes . As they came down the front of the flap moved back in the recess. This kept the centre of gravity in the same place and meant the Skua did not need to be re-trimmed when they operated.
Modern plans of the Skua get the shape of the flaps wrong, showing the two ends of the flap as being parallel to each other (in the same orientation as the aileron). In fact, the outboard end of the flap met the long sides at right angles; it was not parallel with the other end. Bizarrely, the 1940 plans of the Skua in "Aircraft of the Fighting Powers" got the shape correct and the crude raised panel line representation of them in the Frog/Novo Skua is also the correct shape. Unfortunately, every model of the Skua and Roc issued since then gets them wrong.
The Airwaves etched brass details set for the Frog/Novo Skua has a set of flaps, but the beautiful "ribbed" effect on their underside is completely wrong. The undersides of the flaps were featureless except for the two indents for the mechanism.
Undercarriage
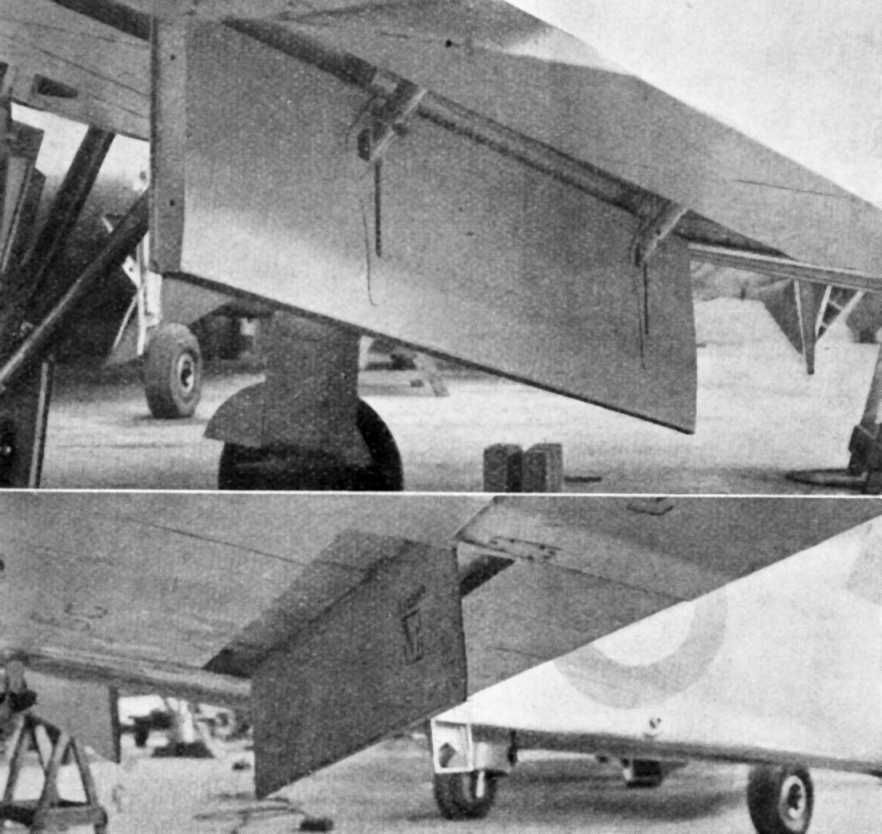
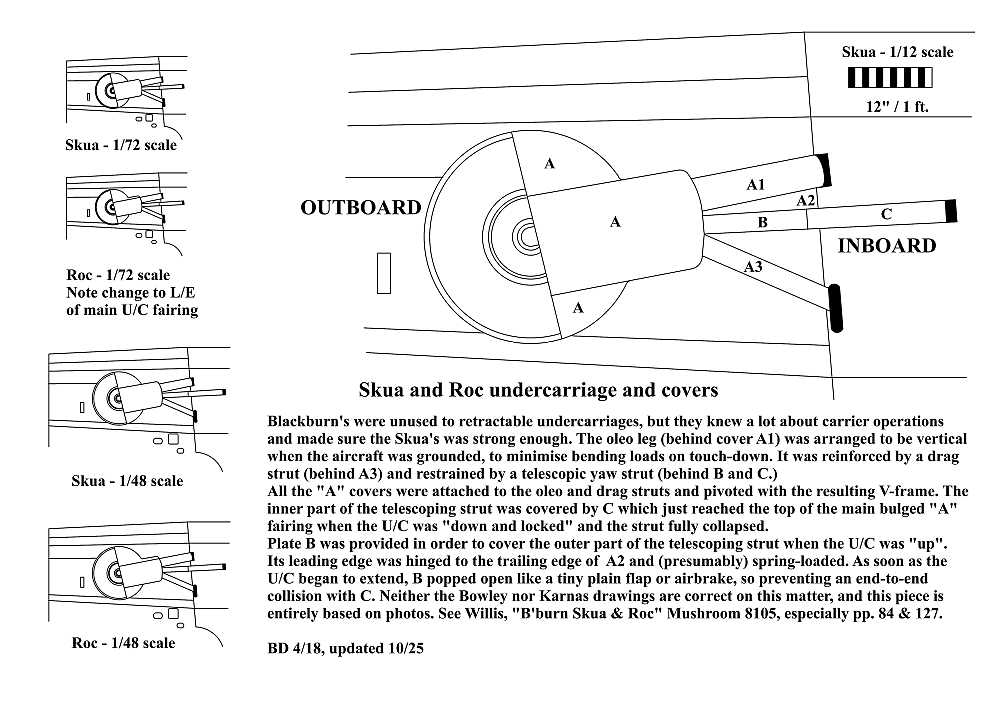
No model of the Skua or Roc gets the undercarriage covers completely right. The diagram below was prepared by Brian Derbyshire to illustrate the configuration. Note in particular panel "B" which ends up at right angles to the airflow once the u/c is extended. Also, note there was a subtle difference between the undercarriage of the Skua and the Roc.
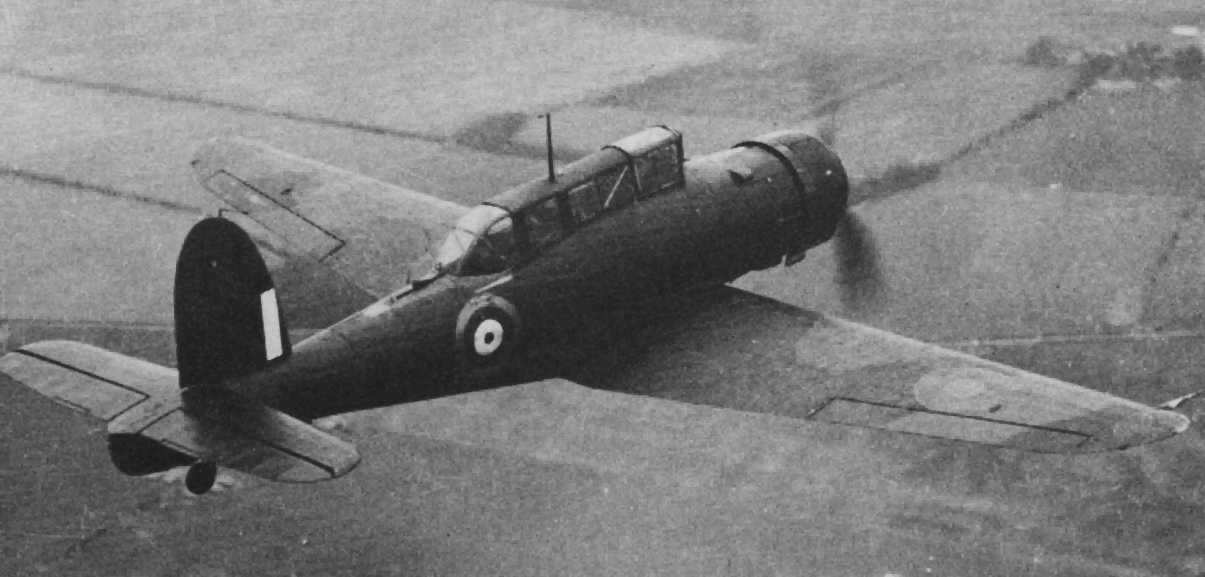
Not a Skua, a Roc, but it clearly shows the two small panels marked "B" in Brian Derbyshire's diagram above which pop open when the undercarriage is extended, at right angles to the airflow like two tiny flaps or air brakes. It also illustrates the "flat bottom" of the Roc and you can just make out the gunner's trapdoor exit.
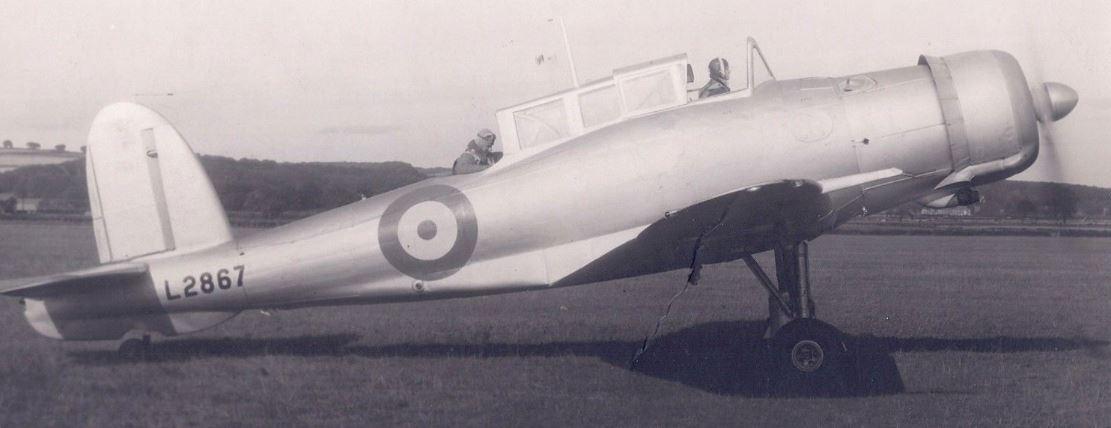
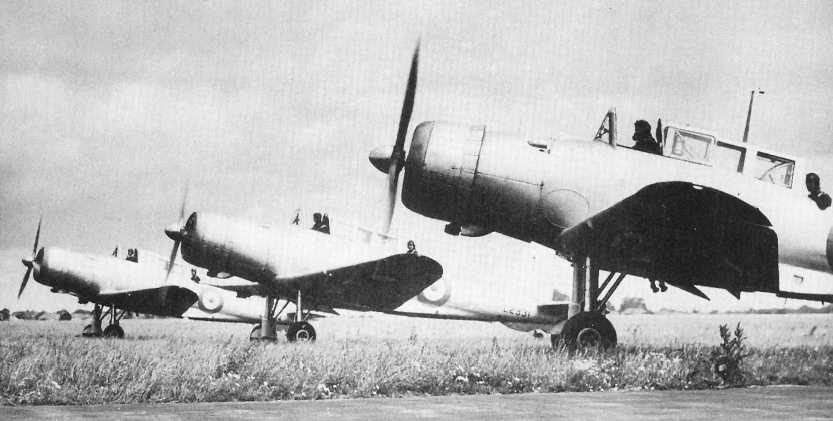
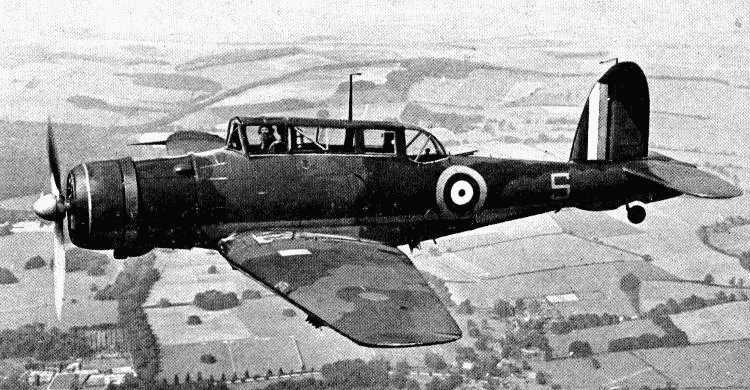
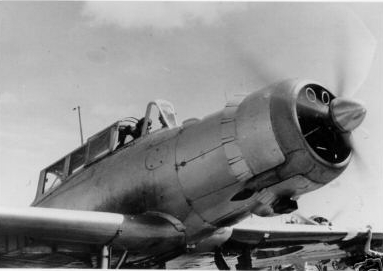
A photo of Skua L2867 taken at the Blackburn factory airfield at Brough next to the Humber. It is important to understand that the undercarriage legs of the Skua are vertical when the aircraft was on the ground. This means that once the aircraft is in the air they look raked back. This is not the way most WW2 tail-wheel aircraft sit on the ground and catches out many modellers.

Another view stressing that the undercarriage of the Skua was upright.
The Skua and Roc's tailwheel did not retract. It could castor to the sides for taxiing but was tensioned to return to the centre. The tailwheel was held by a fork attached to both sides. A photo exists in the British Aerospace collection of a modification done to the tailwheel to reduce shimmy (the photo is reproduced on page 129 of Matt Willis's "Blackburn Skua and Roc"); the modification consisted of a "scissor joint" on the tailwheel supporting strut, ahead of the wheel. However, I've never seen a photo of either a Skua or Roc in service with this modification.
Pitot Tubes
The two styles of pitot tubes used on both Skuas and Rocs. On the left is the early "two-pronged" type, and on the right is the later "single prong" style.
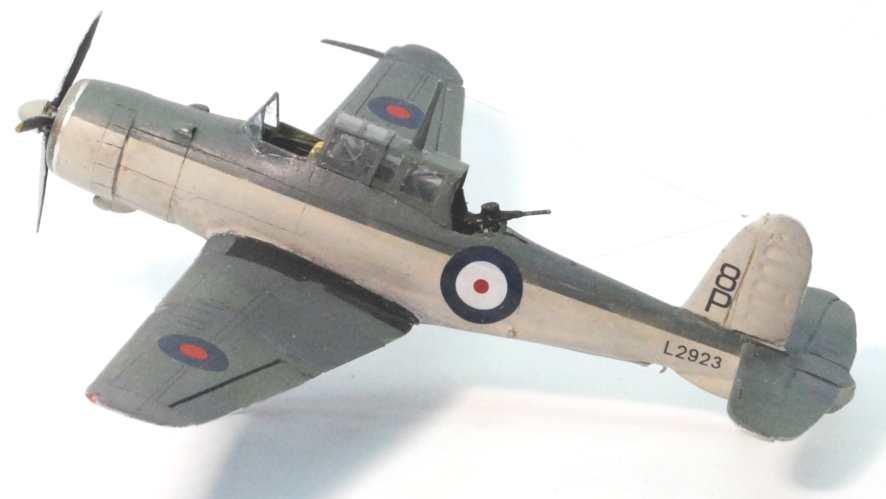
The pitot tube for measuring airspeed on both the Skua and Roc was mounted on the leading edge of the starboard wing; 8 cm out from the join line of the wingtip section (where the tips tilted slightly upwards on the Skua). On early Skuas and Rocs, the pitot had two "prongs", one above the other that bent upwards to meet the thicker supporting structure. On later Skuas and Rocs, the pitot had a single, straight "prong". Just when in the production process the switch over from the early to later type occurred is unclear. The earliest serial number Skua I can find photos of with the later type of pitot tube is L2923, built towards the end of the first production batch of 69 Skuas. The last Roc serial number with the old style of pitot tube I can find photos of is L3090, which was built about one-third of the way through the Roc production run.
Panel Lines
The modeller is hampered by a lack of accurate plans for the Skua or Roc showing the proper position of panel lines and access hatches. All of the published plans are wrong. The plans in Matt Willis' "Blackburn Skua and Roc" (Mushroom Model Publications) are the best available and are generally okay for the Skua fuselage, but even these plans are inaccurate for the panels on the wings and the Roc fuselage. It is important to understand that "lap" joints were used on the plating of the wings and fuselage of the Skua and Roc. So the panel lines are much less visible than the "butt" joints that were increasingly used by other aircraft manufacturers. The panels were arranged in such a way as to minimise drag and their lines would also have been softened by the use of "jointing compound" to smooth out the edges. This means the lines only catch the light under certain conditions and are usually most visible when viewing the aircraft from the rear. It is heart-rending to see beautifully built models of the Skua and Roc sporting delicately applied panel lines that are in the wrong place and just not visible on the real aircraft. The lines around the detachable panels on the nose of the aircraft, and the oval panels for the front fuel and oil tanks were very visible but for the rest of the aircraft, they were largely invisible in most photographs. What can sometimes be picked out as panel lines, in some light conditions, are in fact rows of rivets. The lines of rivets that spanned the wing along the line of the main spar are sometimes particularly evident and have been misinterpreted as panel lines on all published plans and model kits. The position of access panels on top of the wing is particularly misrepresented in both plans and kits. The photo below, of one of the Skua prototypes, does show up panels on top of the wing, but more as a slight difference in colour rather than panel lines. A comparison with the wing preserved at the Fleet Air Arm Museum shows that the pattern of panels was carried over to production Skuas.
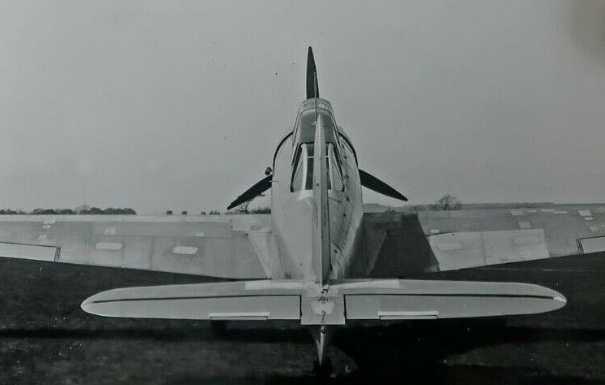
Photo of the rear of the second Skua prototype showing numerous small panels on the wings of a different texture or colour.
If you are building a Skua or Roc in 1/72 scale the best advice I can give is to get rid of any panel lines on the wing altogether. All the model kits currently on the market get the position of the lines wrong anyway and the lap-jointed panel lines are hardly going to be visible. For 1/48 scale Special Hobby and Warrior models the panel lines and rivets are going to be more evident. I have put together some general configuration plans to help modellers, you can get them at the link below. They are in PDF (Acrobat file) format.
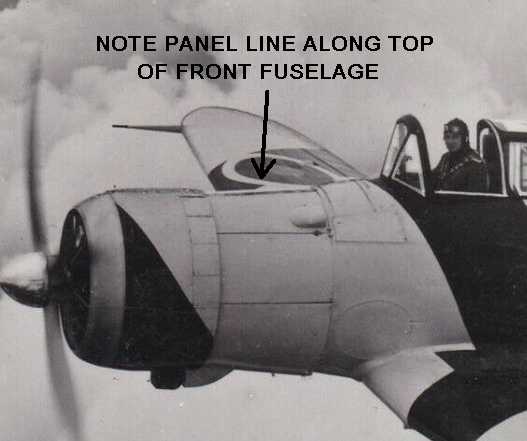
Save yourself the bother of trying to get a flush surface on the seam along the panels at the front front of the fuselage. There was actually a panel line running along the top (not shown in most plans).
Some of the points in the configuration plans are illustrated by photos of the wrecked Skua at the FAA Museum at <this link>.
Anti-Spin Parachute Cables
Two cables ran from the front cockpit along the top of the starboard side of the fuselage, making a slight dog leg to avoid the dingy stowage door. The cables were also a feature of the Roc. One cable released the anti-spin parachute housed at the rear of the rudder, and the other cable operated to cut the parachute free once it had done its job. A very fine detail, hard to reproduce on any model. The one time a raised panel line is called for! Another thing to note in this photo is that the holes for the machine guns were slightly elevated from the very front of the wing.
Bomb Crutch
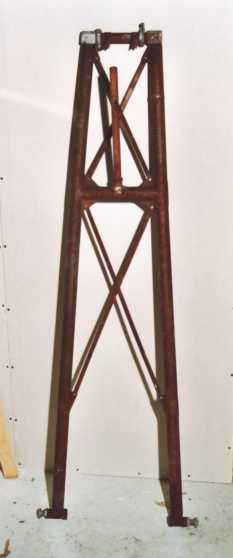
Here is a photo of a recovered Skua bomb crutch from the Norwegian Aviation Museum at Bodo.
Unfortunately, Special Hobby got the shape wrong on their 1/48th scale Skua (put right on the 1/72 version).
Interior Detail
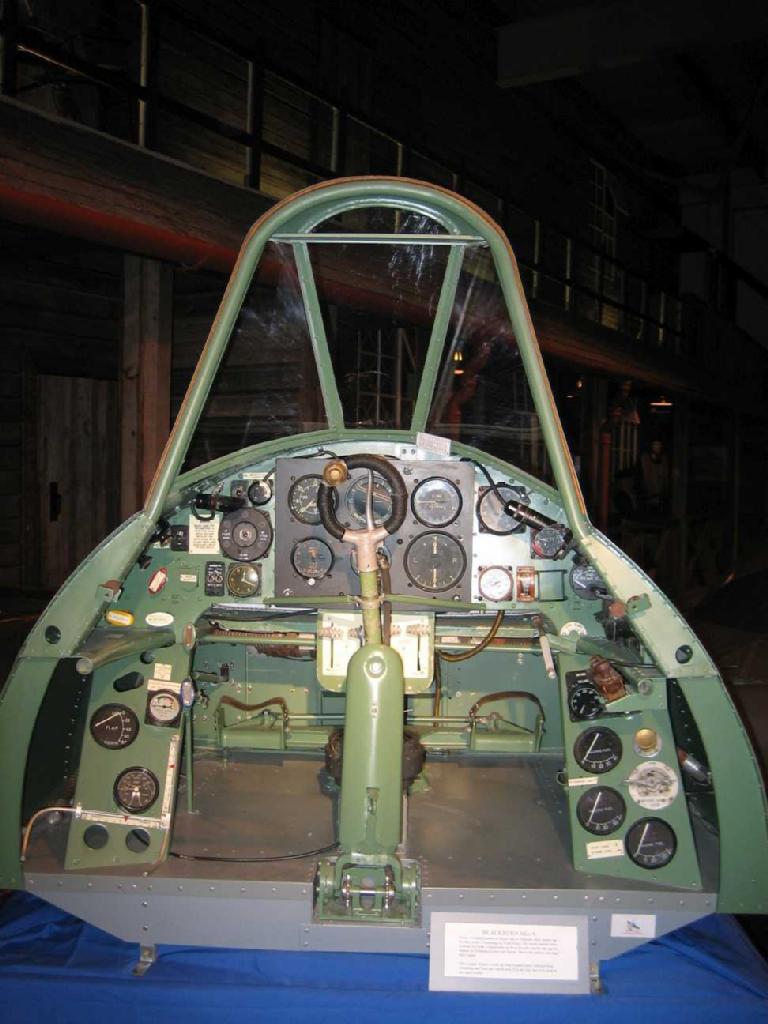
Here is the rebuilt Skua Cockpit from the Norwegian Aviation Museum at Bodo as it was displayed at a reunion of surviving Skua crew at the FAA Museum Yeovilton in 2006. Of particular note is the joystick, it is in two parts, the top half only goes side to side and is mounted on top of the thicker bottom half that goes back and forwards. The whole thing is surmounted by the usual British circular "spade grip" with the firing button and wheel-brake handle. The top of the joystick is almost level with the very top of the instrument panel, which makes you appreciate just how high in the cockpit the pilot sat and just how large an aircraft the Skua was. Imagine yourself sitting with your feet on the rudder bar and hand on the control column and you'll appreciate how vast the cockpit space was.
One thing missing from the rebuilt cockpit is a reflector gunsight. There seems to have been two different ways of mounting this, illustrated by these two photos.
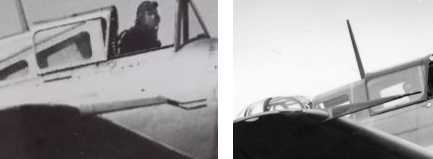
This colour photo, taken of L2991 shot down over Norway, clearly shows some struts going up to either side of the front windscreen from the mounting on which the reflector gunsight would sit.
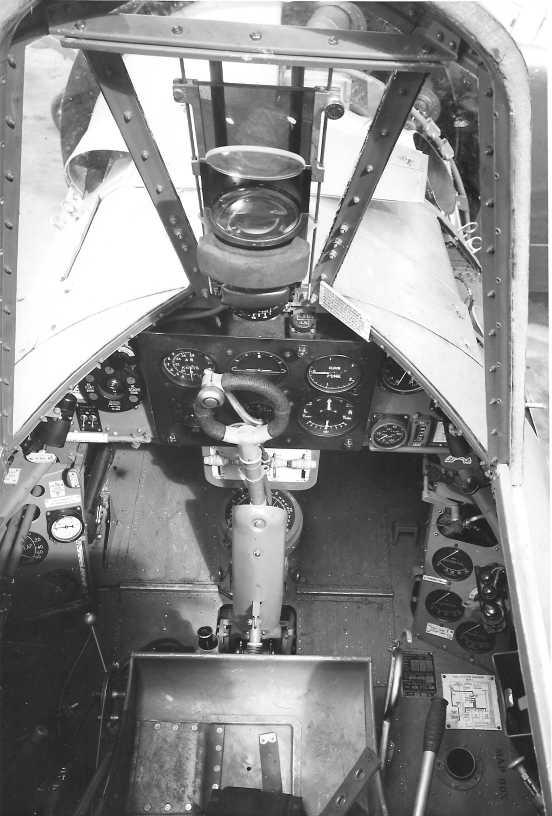
Yet this photo shows a reflector gunsight fitted but there is no sign of those struts. A mystery? Examination of photos show both styles of sight on both Skuas and Rocs, so it is not a matter of one style being for Skuas and another for Rocs. Rocs used gunsights for fighter training along with a camera gun mounted in a small pod near the wing root. The extended tinted sun glare protector goes up much further than that on fighters like the Spitfire and Hurricane. Notice the starboard top panel on the front fuselage has been removed, showing that the panel join ran along the top of the fuselage.
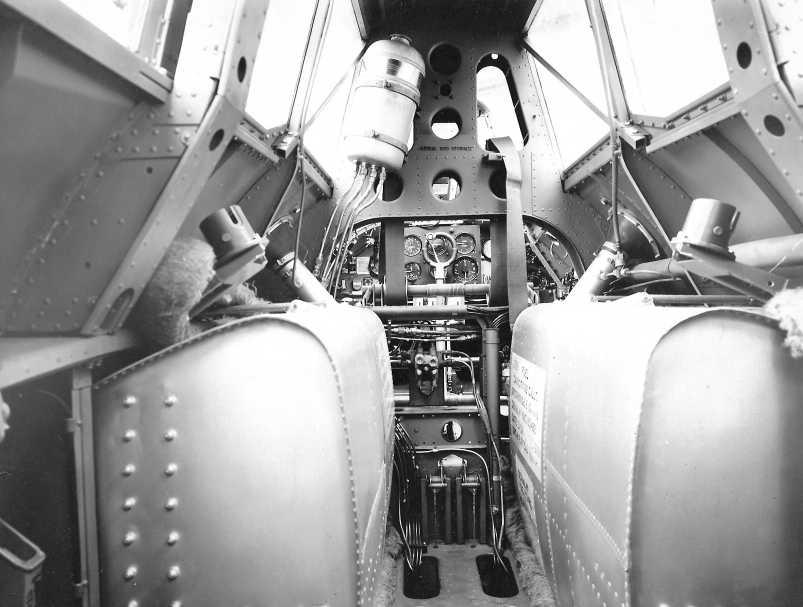
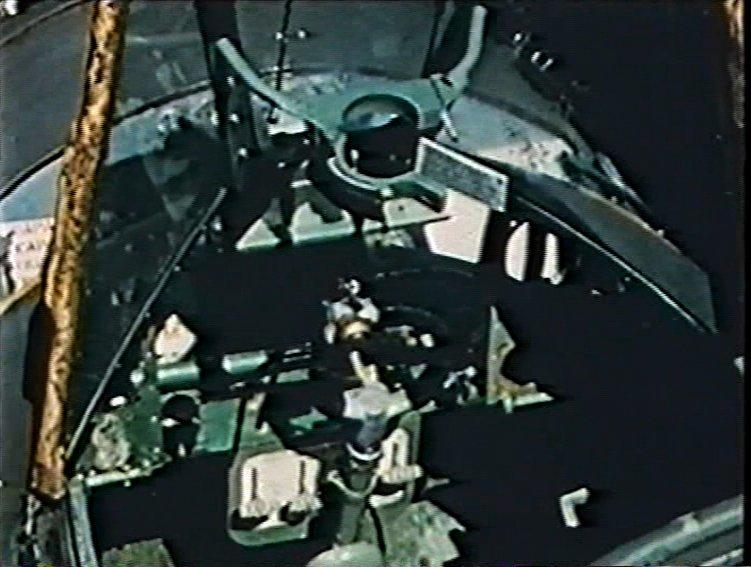
The photo above shows the view looking forward towards the pilot's position. You can see the large cylinder mounted high behind the pilot, this is often referred to as an oxygen tank, but is actually a hydraulic header tank. You can see the two large fuel tanks with inlets to fill them from the sides. The colour of the cockpit was the standard British "interior green", although the fuel tanks and hydraulic tank look to be in natural metal. It would seem that the pilot's seat has been removed to give a better view of the forward cockpit. The seat had a wide range of travel up and down and it looks as if there was some sort of roller arrangement to keep the seat harness taut.
The rear cockpit was occupied by either an Observer (the Royal Navy Air Branch term for a navigator) or a Telegraphist/ Air Gunner (TAG). In the space between the pilot and the second crew member were two fuel tanks, side-by-side, with just enough room between them for the second crewman to make his way up to the pilot if required. In fact, on combat missions, the second crewman was issued with a bag of corks of various sizes so they could attempt to plug any bullet holes in the fuel tanks! The conditions for the second crew member were very spartan. There was no chair as such, just a bench that spanned the fuselage with a bit of padding in the middle. The bench meant that the Skua could easily accommodate two people sitting side-by-side in the back. There was no seat harness to restrain the second crewman in place for take-offs and landings, just a simple webbing strap to attach to the floor to hopefully prevent you from falling out! There was no bulkhead between the bench and the fuel tanks, but a bar could be clipped across to give something to hold onto. Many model kits get this area of the Skua wrong, providing a non-existent seat or a bulkhead to separate off the fuel tanks.
"Now, for those who don’t remember, in the Skua rear cockpit you sat on a covered crossbeam with no back to it and to use the gun you stood up and used a thick strap, known as the fighting strap, across your back and pulled the gun up with its arc mounting." - Quote from TAG "Doc" Goble - See full article <here>
There were two reasons for the strange, spartan layout of the gunner's position. Firstly, the Skua was designed so that it could be converted into a pilot trainer with a whole "kit" of controls and instruments slotted into the gunner's position (see pages 48 and 49 of Peter C. Smith's "Skua!" for details) although there is no evidence for this being done in service. Secondly, the heavy 500 lb bomb was lifted into place underneath the Skua by two small, manual winches that were clipped into place at the rear of the gunner's compartment. Cables from these winches were led forward to two detachable pulleys above the bomb recess from where they could be let down into the recess to winch the bomb into position (diagram in appendix 5, page 254, of Peter C.Smith's "Skua!"). Any sort of bulkhead between the gunner and fuel tanks would have obstructed the cables.
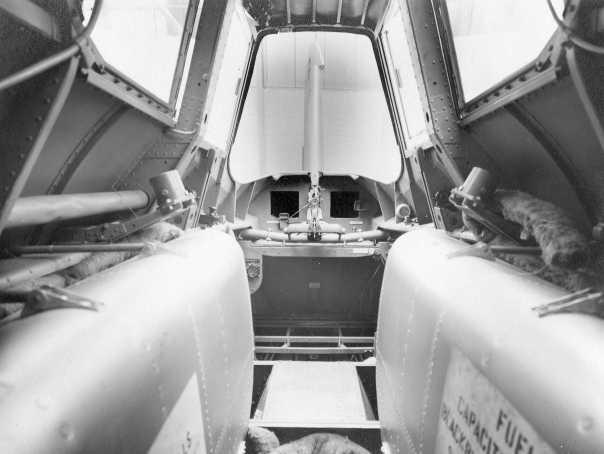
The view looking aft from between the two fuel tanks towards the Observer/ TAG position. The scale is somewhat misleading as you naturally tend to think of this as a tiny space (like a DH Chipmunk), but the Skua was a very large aircraft. There was no seat in the rear cockpit, only a bench with a bit of padding the second crewman sat on (it is not present in this photo). That bench was wide enough to accommodate two people if required. Beyond that, would have been the radio kit (again, removed in this photo) and above that the machine gun mounting that folded down when not in use. The second crewman did not even have a proper floor to stand on, just a pair of metal extensions, one for each foot. In this picture, the folding rear of the canopy has been removed altogether. It is important to understand that the machine gun COULD NOT BE USED until the canopy was swung up. The second crewman had to leave his bench, stand precariously on his foot panels, and then swing the canopy back so it was behind him, only then could the machine gun be bought out of its recess into position to have the magazine fitted and be ready to fire. The magazine could not even be fitted if the gun was in the "stowed" position. The gun barrel could indeed protrude a little out of its recess, which has led some people to think it could be fired when the canopy was down (rather like the Ju 87 Stuka) but that was not the case.
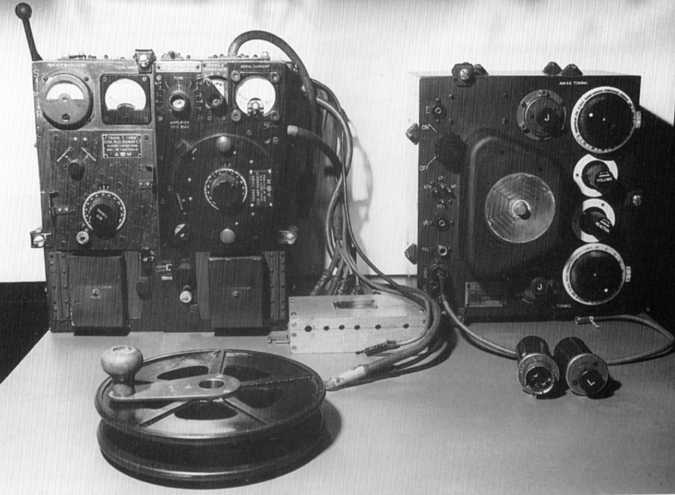
The communication equipment carried by the Skua. On the left is the T1083 transmitter and on the right is the R1082 receiver. In front, on the left, is a spool used to wind out and in the long trailing aerial that could be used with the equipment. The transmitter and receiver would have been mounted side-by-side on a tray underneath the shelf that accommodated the rear machine gun. On the Skua, I believe they would have been mounted the other way around, with the transmitter on the port side and the receiver on the starboard. A contemporary diagram in "Flight" magazine clearly shows them mounted that way, although the key to a later, widely distributed, "cut-away" diagram of the Skua by John Weal has the positions reversed. The aerial spool was located on the port side of the gunner's position. The location of the R1110 homing receiver on the Skua aircraft is a mystery.
During take-off and landings, it was usual for the second crew member to lock the rear cockpit covering open and stand at the rear of the cockpit bracing themselves.
Beware of using an official diagram of the interior of the Skua reproduced on page 121 of Matt Willis's "Blackburn Skua and Roc" for guidance. It refers to the layout of the prototypes, the production machines were substantially different, and the radio is in the wrong place as are the flare racks. Similarly, beware of some coloured artwork widely distributed on the internet purporting to show the layout of the rear cockpit, it seems to be largely a work of fiction.
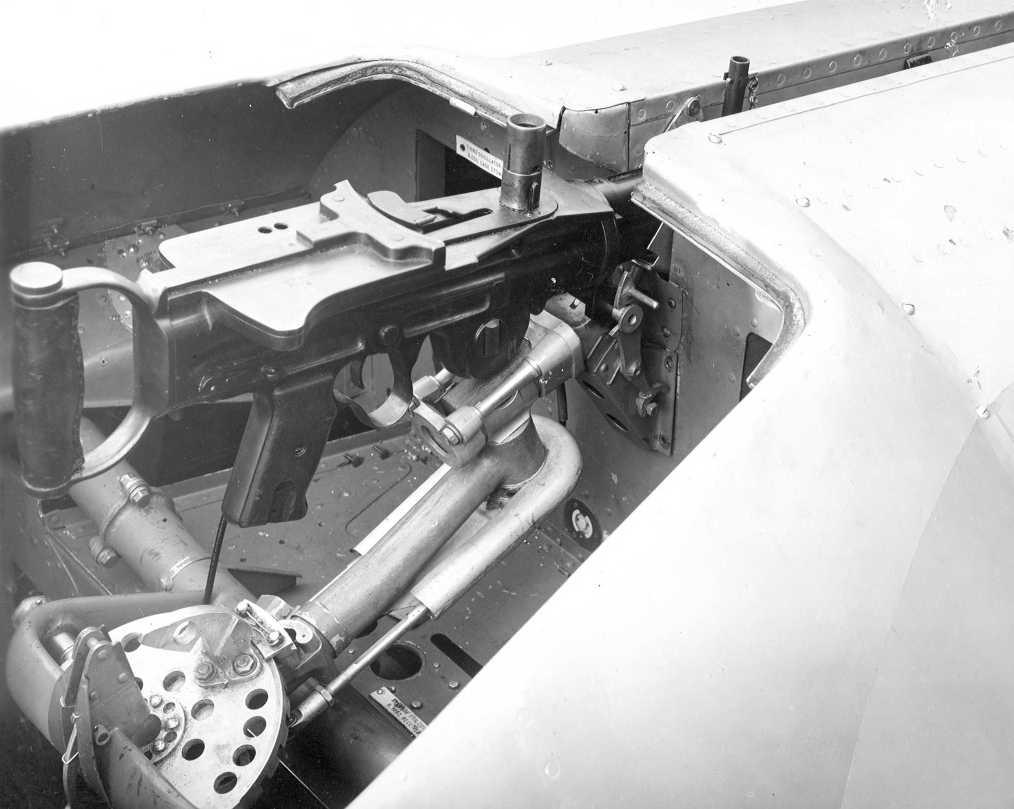
This photo shows the machine gun (Lewis .303) in its stowed position. The barrel sits in a recess in the top of the Skua's fuselage. The cylinder protruding from the top of the gun is where the circular magazine would be placed. There is not enough room for the magazine to be fitted until the gun is swung up out of its recess. In turn that cannot be done until the rear canopy is swung forward. Spare magazines were fitted to the sides of the compartment. The gun mounting was a variant of the Fairey "high speed" mount also used on the Fairey Swordfish torpedo-bomber and Fairey Battle bomber. You would expect to see a lever (looking like the "brake" lever on a bicycle) mounted on the spade grip of the gun, but it is missing from this photo (see next photo). When this lever was pulled the gun mounting was free to be rotated on the metal quadrant visible on the base of the mounting. When the lever was released the mounting locked to give a stable firing support. This gave the mounting a surprisingly large arc of fire, to the sides and even downwards over the side of the cockpit coaming.
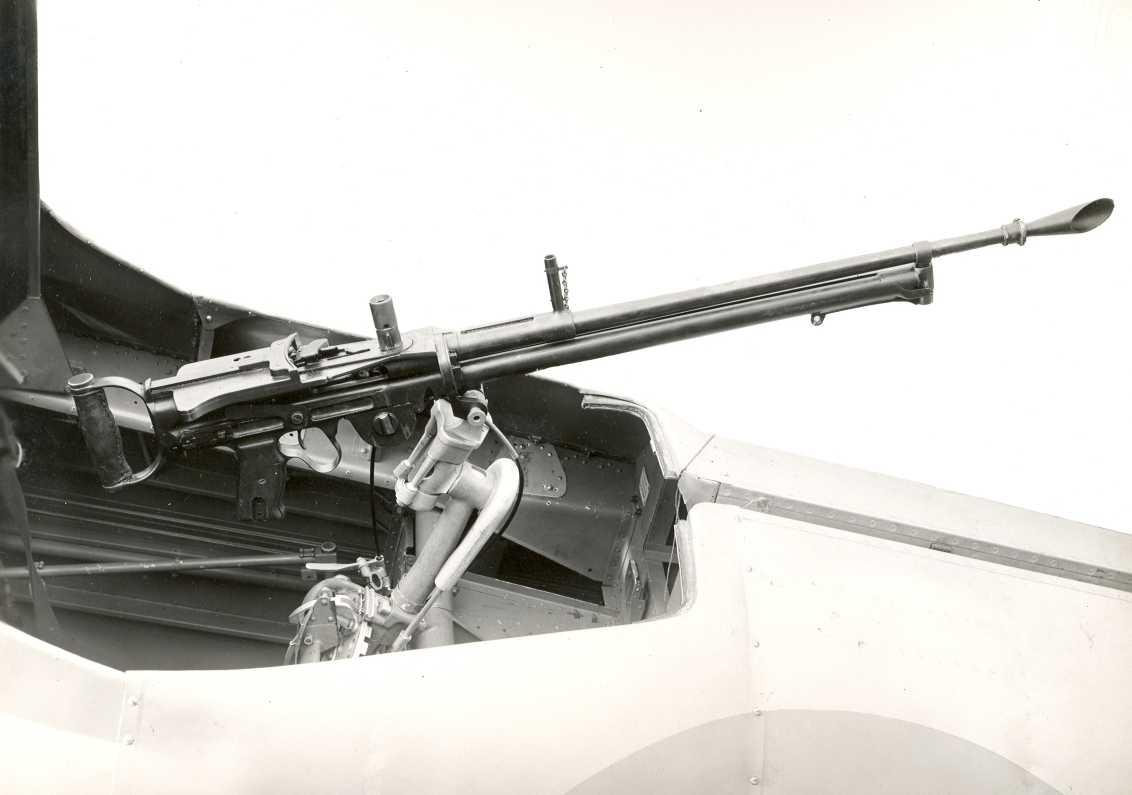
The Skua rear machine gun in its raised position (magazine still not fitted). In this image, you can see the "brake lever" that should be attached to the spade grip has been disconnected and is dangling down below the machine gun. Also of note is the prominent shelf-like structure on the side of the cockpit (repeated on both sides of the cockpit) which incorporated the hinge for the rear canopy. This shelf is not featured in any rear-cockpit detail on any Skua models. The Lewis Gun was replaced by the Vickers "K" gun in RAF service, but the Royal Navy Air Branch retained the Lewis through 1939/40. So for a model representing a Skua in the Norwegian campaign, a Lewis gun should be used. For a Skua flying over East Africa and the Mediterranean, in late 1940 and early 1941, a Vickers K gun may be more appropriate. The most noticeable difference is that the Lewis has a pistol grip with trigger underneath the gun; whereas on the Vickers K the trigger was built into the more boxy spade grip and there was no pistol-grip under the gun (the K could be modified with a pistol-grip and a traditional rifle-stock for ground use). The drum magazines were also different; that for the Lewis was ridged and rotated as the gun was fired, whereas the magazine for the K was smooth and did not rotate.

Here you can see the rear machine gun poking up from its recess with the rear section of the canopy closed. It could not have been fired when in this position. Other things to notice in this view are the footstep left in the down position and behind it the protruding pipe through which a trailing aerial could be lowered for long-range radio communication via morse code. Also visible is a square of light coloured gas detection paint on the wing, this changed colour if exposed to mustard or chlorine gas. These photos are usually listed as showing Skua L2928, which is the serial number on the decals of the Frog kit when first released and also used on the Airlines and Novo releases (although it is hard to read the serial number on even the best resolution images and other sources list it as either L2923 or L2929). The model decals do not feature the "S" on the fuselage and the painting diagrams show the demarcation line between the top camouflage and the under-surface being lower than shown on the photographs.
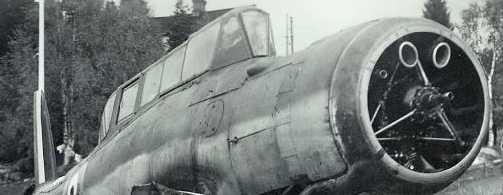
A detail of Skua L2942 which crash-landed in Sweden after a raid on Trondheim launched from the aircraft carrier HMS Furious. This was late in September 1940, and you can clearly see the extra thickness of armoured glass added to the front windscreen and the extra metal plates added to the bottom of the two side sections of the windscreen for extra protection. This modification was carried out in the second half of 1940. Also of note in this photo is the obvious indent of the window nearest the rear of the canopy. These windows on either side of the second crewman could be opened by sliding them forward. Notice the two engine air intakes which look like "eyes" and the triangular supporting structure inside the engine cowling.
ROC INTERIOR
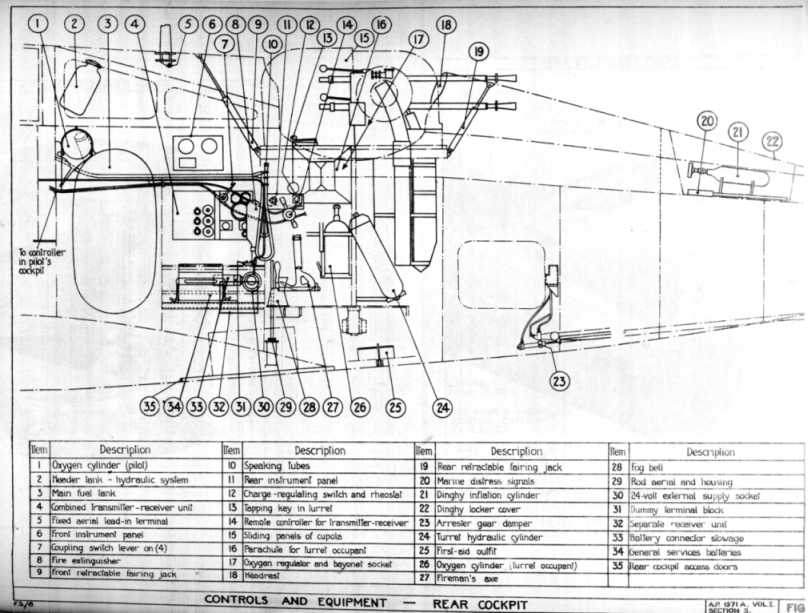
Diagram of the rear interior of the Roc showing it had a single fuel tank behind the pilot (unlike the two side-by-side tanks of the Skua). There was space for the gunner to drop down to adjust the radio equipment or use the escape/access hatch in the floor. It does not specify which side of the fuselage each bit of equipment is mounted on. I've never found a photo of this area (if anyone ever finds one, please let me know). Unfortunately, both the Special Hobby and Pavla models get this interior wrong, duplicating the Skua's twin fuel tanks instead.
ENGINE
The Skua and Roc were both powered by the Bristol Perseus XII nine-cylinder, sleeve-valve, air-cooled radial engine (the two Skua prototypes used Bristol Mercury engines and need small bulges in the cowling over the engine rockers). Notice the two air inlets looking like "eyes" inside the cowling. Engine exhaust went to a collector ring around the front of the engine and then out through the exhaust on the starboard side of the aircraft. This quickly caused heavy staining on the starboard side of the fuselage and the starboard wing-root. The box-type air inlet under the engine was usually black. The collector ring and exhaust pipe were a very dull bronze colour.
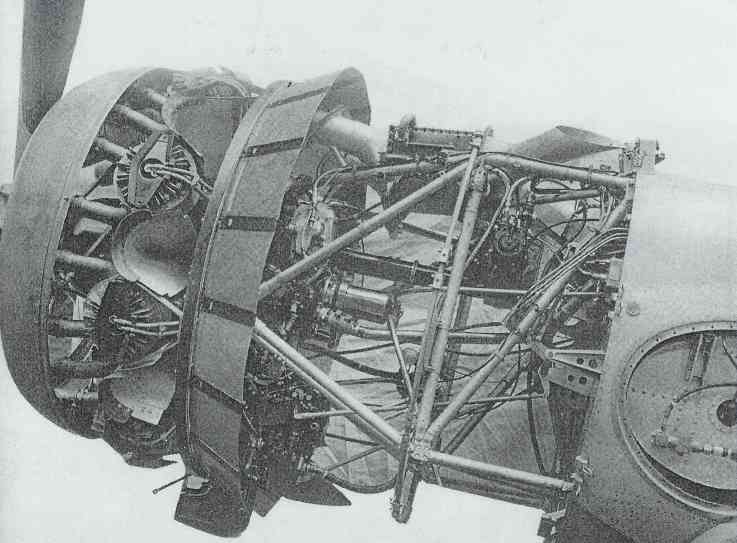
Details of the engine mounting. Most of this would be hidden on any model of a Skua. But notice the baffles between the engine cylinders to concentrate the airflow over the cylinder cooling fins. These probably would be just about visible through the front of the engine cowling in 1/48th scale. Such baffles are rarely included in kits, even in after-market engine upgrade kits. Such kits are usually based on photos of engines in aviation museums, where the baffles are not in place.
Make sure you don't miss the pages on Skua and Roc Colour schemes.
Also, check out more photos of Skuas on the Skua photos page.
LIST OF KITS PRODUCED OF THE BLACKBURN SKUA
(CHRONOLOGICAL ORDER)
FROG - 1939. 1/72 scale
The first plastic model kit of the Skua was in Frog's very early "Penguin" series of the late 1930s, contemporary with the Skua. It was made from cellulose acetate, a hard plastic most commonly seen in spectacle frames, a different type of plastic to the polystyrene that is used in modern kits. It had the feature of "folding wings", held in place by an elastic band. The kit continued to be manufactured until 1949.
Below are two photos of a fantastic pristine example from Peter van Loon.
You can visit Peter's website at www.frogpenguin.com
You can visit Peter's website at www.frogpenguin.com
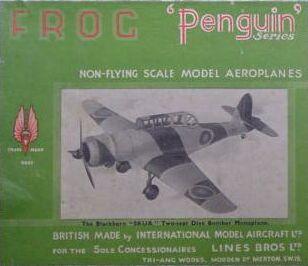
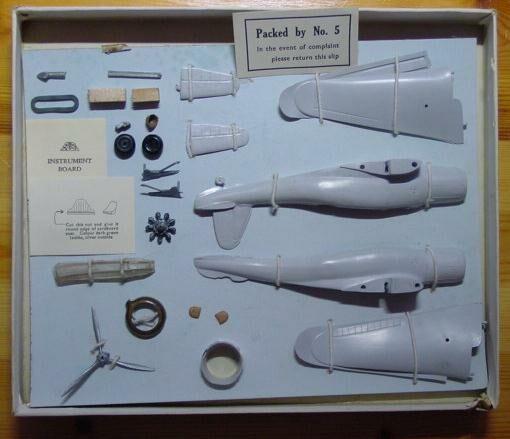
If you should ever stumble upon such a kit don't build it! It is worth a lot as a collector's piece in its unmade state. A "Penguin" was RAF slang for a ground-based officer who did not fly. Frog adopted the name to distinguish their new non-flying plastic models from their existing range of balsa flying model kits (FROG stands for "Flys Right Off the Ground").
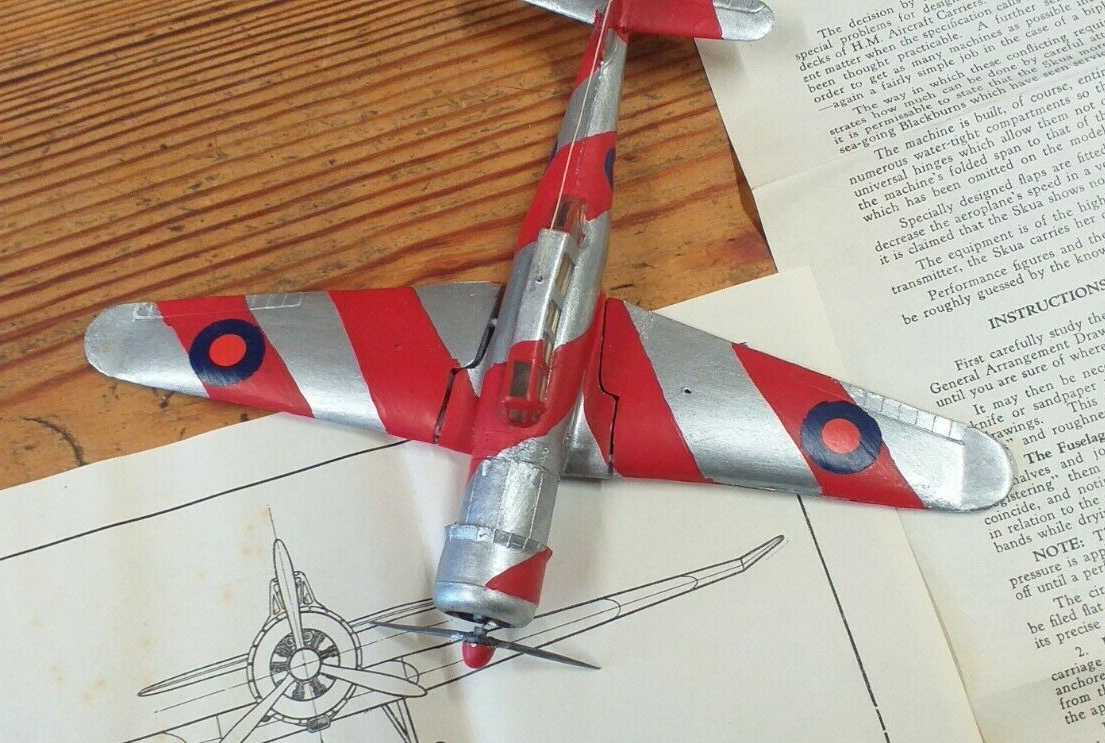
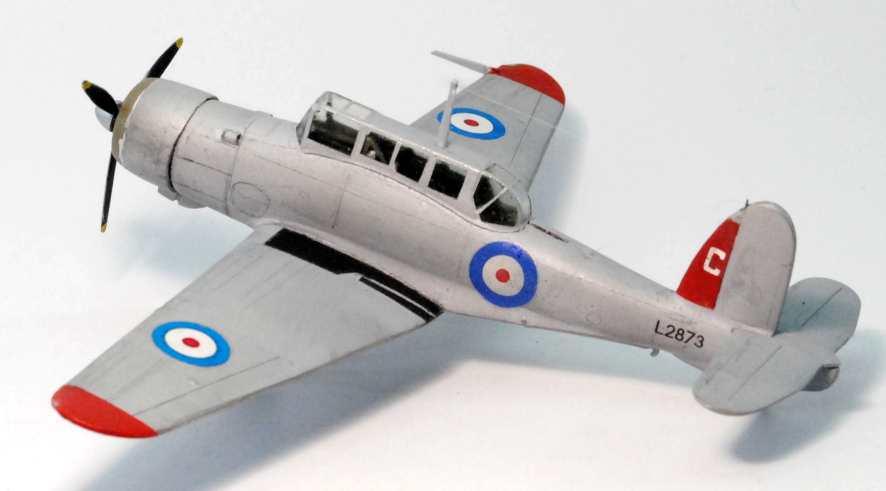
A built example of the 1930's Frog Skua. The kit featured a ficticious red and silver scheme that confused a generation of aviation pundits because it was referenced in Putnam's "Blackburn aircraft since 1909". Notice that the wings were held in place by an elastic band that enabled them to be twisted back into the folded position.
The Skua was the subject of many balsa kits during the war years (both flying and static) and there were also a couple of crude "recognition" models of it made for the military in both the UK and USA in solid, black, bakelite-type plastic.
FROG 1/72- 1964 (Reissued by Novo, Air Lines, Chemetic, Donetsk TF, Revell, Eastern Express, Ark Models)
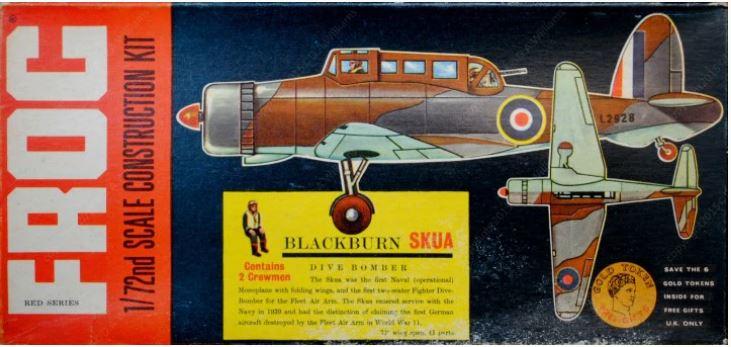
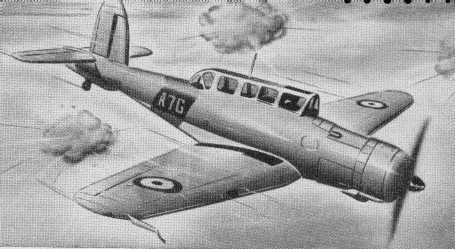
The original Frog packaging when first released in 1964 showing a spurious colour scheme and that infamous machine gun poking through the rear of the canopy, where it never was.
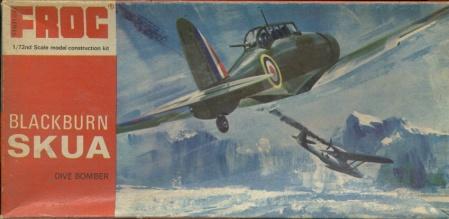
The box art was reissued by Frog in1968, still shows the rear machine gun incorrectly.
In 1964 Frog issued another 1/72 scale model of the Skua (sold under the brand name "Air Lines" in the USA). This was made of polystyrene plastic. The same mould has been used to produce the same product under the name of Novo, Donetsk, Chematic, Revell, Eastern Express and most recently by Ark Models. Back in 1964, it was a bad representation of the Skua and the same holds true today, there having never been any effort to correct the many errors. To list them...
1. The wings and tailplane are both incorrect, being narrower in chord than they should be, thus the wing area and tailplane areas are much too small (see diagram below).
2. The fuselage bottom aft of the wings is represented as a flat area with no effort to represent the wing fillets.
3. The rear gunner's canopy is represented as if the machine gun protruded through the canopy itself. It did not, it sat in a trough in the upper fuselage and could not be used until the rear canopy was swung back. The model's rear machine gun is very crude and has a strange square box body and no magazine. The way the rear of the canopy mates with the fuselage is also wrong, with a curve to the rear fuselage rather than the straight top the Skua actually had.
4. There is no recess for the bomb (and no bomb) and no bomb crutch.
5. There is no effort to reproduce the "V" frame arrestor hook.
6. The front of the pilot's windscreen is represented as a rectangle, in fact, it was triangular with the broadest part at the top of the canopy.
7. Two air-exhaust bulges are missing from the top of the fuselage between the front canopy and the engine.
8. In an otherwise completely bare cockpit the gunner has a seat to sit on. In the real aircraft, the gunner sat on a bench-like beam with no back to it.
9. The model has the raised panel lines that were the norm for model kits of the time. The oval panel for the front fuel tank on the port side is the wrong shape and the oval inspection panel on the starboard side is missing. The panel lines on the wings are a complete work of fiction.
10. The decals are for L2928. The numerous photos purporting to show "L2928" on the internet never actually show the serial number clearly enough to read and always have a large "S" aircraft serial on the fuselage (see photographs in the section above). L2928 almost certainly had landing lights on both wings, rather than the single lamp the model wings are moulded with.
11. The engine detail is basic but is what one would expect for a model of this age.
The dotted lines represent the size of the wings and tailplane in the Frog/Novo/Chemetic/Revell/Eastern Express kit
Even allowing for the age of the model these are amazing inaccuracies. The most glaring problem of the undersized wings and tailplane can be cured with a replacement set made in resin by either Magna models or Final Touch Products, both of which also provided a vac-form replacement canopy.
The Frog/Novo/Revell model is the one representation of the Skua that actually gets the shape of the flaps correct, albeit the representation is very crude, consisting of just raised lines. The Magna and Final Touch wings get the shape of the flaps wrong!
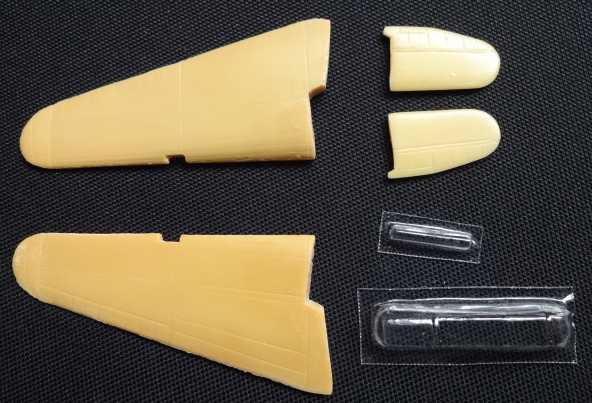
The Magna models replacement resin wings and tailplane, along with vacuform cockpit and leading-edge wing landing light covers.
The picture above is of a masterful reworking of the standard Frog model with corrected parts by Bernard Le Guenno; he built up the wings and tailplane to the correct shape using plasticard. It goes to show what can be done with a lot of hard work. It is a reproduction of one of the Skuas involved in the sinking of the Königsberg.
You can follow Bernard's build of this Skua by <clicking here>. Bernard had to do a lot of research for the project, including the scratch-build of a 500 pound SAP bomb.
Airwaves etched brass kit for the Frog/Novo/Revell kit
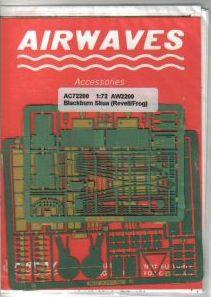
Airwaves released a set of etched brass accessories for the Frog kit. A large number of the parts are for detailing the cockpit. They include a seat for the rear Observer/TAG which is completely wrong (there was only a rudimentary bench in the back cockpit of the Skua, no seat). There are some fine cooling gills, zap flaps and undercarriage doors, albeit the undercarriage doors include some extra sections that completely cover the wheels., this was only the case on the first Skua prototype (K5178), and even then for only a short period. The doors also miss the characteristic "bulge" adjacent to the wheels. The detailed, ribbed underside of the flaps are wrong; they were plain underneath.
In 1964 aircraft modelling was such a popular hobby in the UK that the release of a new kit would be accompanied by adverts in boys comics along with the modelling magazines. Shown above is the black and white artwork used in the original press advertising for the Frog model Skua when it was first released.
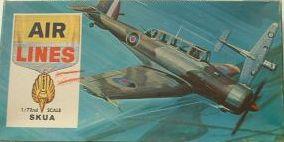
The box art for the Air Lines incarnation of the kit, the same artwork was used for the Novo release. Frog models were sold under the Air Lines brand in the USA.
Box art for the Revell rebrand is shown below. The text on the box seems to suggest the Skua only ever shot down one aircraft! There are a lot of German aircraft at the bottom of Norwegian fjords, and Italian aircraft in the Med because of the Skua!
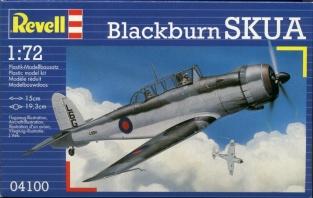
Above: box art for the Revell offering. The Revell version had some good decal options, but they have been labelled the wrong way around in the instructions. The Skua with L6G on the rudder (as per the box-art above) is from 806 Squadron on HMS Illustrious, while the one with the camouflaged rudder and yellow ring around the fuselage roundel is from the Fleet Fighter School at Eastleigh. The Revell decals are the best quality of the various reboxes.
The box art for the Chemetic release featured an RAF rather than a Royal Navy camouflage scheme on the box art.
The box art for the Chemetic release featured an RAF rather than a Royal Navy camouflage scheme on the box art.
The latest reincarnation of the old Frog moulds.
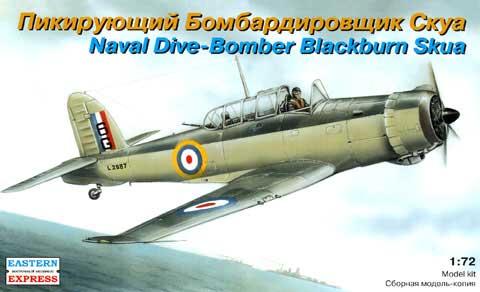
Above: Box art for the Eastern Express version, the same box art is used by Ark Models. The Eastern Express version features decals for a camouflaged L2987 (as per box art) and a silver L2933.
WARRIOR MODELS 1/48 - 1990s
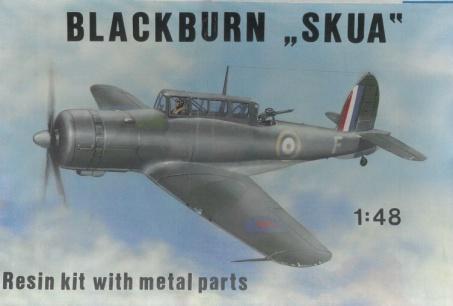
A magnificent 1/48 scale resin and white metal model of the Skua was issued by Warrior models in Poland. When this was first released it was at the cutting-edge of what was possible in resin and was very welcome to anyone who wanted to make a model of a Skua, having only had the poor Frog mould available beforehand. It has lots of interior detail and the overall lines seem spot on. The bomb recess is in the right place, being well aft and not going forward of the main wing spar. The windscreen in front of the pilot is triangular, as it should be. It has the correct Lewis machine gun for the rear cockpit. The wing fillets do not look quite "right" to me, but at least the underpart of the fuselage rear of the bomb recess is curved rather than flat. The bomb crutch is slightly the wrong shape. The shape of the flaps is incorrect. The one thing that lets the kit down is the decal sheet included with the kit which is hopeless. It offers only one scheme for a Skua, but gets the serial number wrong, L2723 was never a serial number for a Skua (it was actually a Fairey Swordfish). All the other markings on the decal sheet are for Boulton Paul Defiants! However, Warrior then bought out an add-on replacement set of decals (catalogue number D 48001) which was excellent and enabled a whole range of different Skuas (and Rocs) to be represented.
Dujin 1/72 RESIN (2000s ???)
The French company of Dujin released a limited-run resin kit of the Skua (Their catalogue number DA7253). I'm guessing this would have been sometime in the early 2000s. I've not seen an example of this kit close-up, so cannot comment on its quality or accuracy.
PAVLA (OCTOPUS) 1/72 - 2002
At the end of 2002, Pavla released a 1/72 limited-production injected moulding kit of the Skua. It has no less than 4 decal options. A silver Skua of (L2887) from 803 Sqdn in 1939, camouflaged L2953 from the attack on Mers-el-Kabir, camouflaged L3048 of 803 Sqdn 1940 and L3007 in "tiger stripe" target towing livery. It has some very fine resin parts. Can I stress that this model is not from the old Frog mould. It was a completely new model with very fine recessed panel lines. The outline of the wings is spot on. The bomb recess is in the correct position but it has rounded edges rather than the the straight edges of the real aircraft. The bomb crutch is the right shape. Very welcome is the addition of a nice resin representation of a 500 lb SAP bomb. The engine is well detailed although it has no air baffles between the cylinders (hardly noticeable at this scale). There is a somewhat crude Lewis gun. It has a vacuform canopy. The wing fillets are not quite right (see my pencil diagram above for the correct cross-sections), and the undercarriage leg covers do not have the correct "bulge" in them. The model includes a "seat" for the rear Observer/TAG (the rear cockpit had a "bench" rather than a seat). The panel lines on the fuselage are generally accurate but those on top of the wing are completely wrong. The flaps are the wrong shape. The kit also does not feature the twin "strakes" under each wing, to which a bomb carrier could be attached. Be aware that this is a limited-run kit and the location and fit of parts is poor compared with more mainstream manufacturers. However, 10 out of 10 for effort.
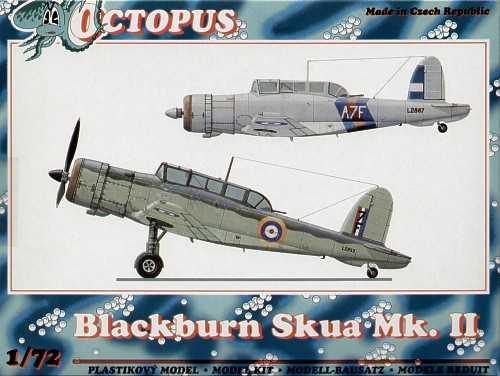
Box art for the Pavla "Octopus Range" Skua has some impressive side-view profiles.
The image above is of an excellent model built from the Octopus kit built by Bernard Le Guenno of the Skua that achieved the Royal Navy's first aerial victory of the war.
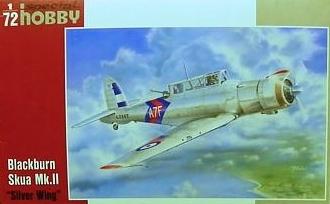
SPECIAL HOBBY 1/48 - 2006/7
In 2006 "Special Hobby" issued a limited edition injection moulded 1/48th scale Skua with resin parts. It was released in two versions "Norwegian Campaign" (in 2006) and "Silver Wings" (in 2007), the box art and decals being different for each. The kit has to be applauded in this scale and enables you to make a 1/48th scale Skua much more easily than with the resin Warrior version. However, it does have a few fairly minor issues. The bomb recess is too far back (it should start directly behind the rear wing spar) and the wrong shape, being more like an inverted bathtub with curved edges rather than straight (see photos above). The undercarriage doors are not quite correct, being the shape required for the Blackburn Roc, not the Skua (see the diagram by Brian Derbyshire in the notes section above). The bomb crutch shape is completely wrong, so will need scratch-building (again see the photo in the notes section above for guidence). Also, there is a solid bulkhead provided between the rear cockpit and the fuel tanks which was just not there in the real aircraft (again see photo above). The resin engine is very detailed with individual cylinders and exhaust pipes, together with the air intake "eyes" and triangular struts within the cowling. Unfortunately, it does not duplicate the air baffles that sat between the cylinders, which would be just about visible in this scale (see the photo in the section above) but that is easily put right with a bit of Milliput. The tiny undercarriage door "panel B" needs to be altered if modelled with the undercarriage down, an easy thing to do (see diagram above). There is a very finely moulded resin machine gun for the rear cockpit, but unfortunately, it is a Vickers "K" gun, rather than the Lewis gun that was fitted for most of the Skua's combat career. The panel lines on the fuselage are generally okay, although some of the access panels along the fuselage are missing. The panel lines and access panels on the wing are unfortunately wrong. The shape of the wing flaps are wrong and one end will need filling in and rescribing. Lastly, in this scale, you might want to attempt to duplicate the hand-holds on the wing tip. The model has two landing lights, one in each wing, this was only true of the first batch of Skuas, the majority only had one light on the port wing but you can simply paint over the starboard lamp if required.
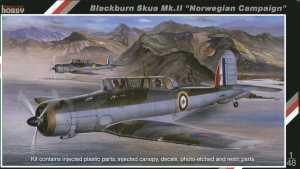
Special Hobby Blackburn Skua "Norwegian Campaign" boxart. Two of the three decal options are wrongly attributed.
Alley-Cat models produce a resin wing-fold detail set to go with Special Hobby 1/48 Skua and Roc (Alley Cat part number AC48021C). Details at <this link> . It's a good buy if you want to build the model with the wings folded. Unfortunately, it duplicates the errors of the bomb recess being too far back and of the wrong shape on the part that replaces the underside.
Review of the Special Hobby 1/48 scale kit by Brett Green
SPECIAL HOBBY 1/72 - 2009/11
In 2009 Special Hobby followed up their 1/48 scale release with a version in 1/72 scale. Like the 1/48 scale version, it was released in two versions, first "Norwegian Campaign" (in 2009) and then "Silver Wings" (in 2011). Each version uses the same box art as the 1/48 scale version. Again it builds into an excellent representation of the Skua. Special Hobby have taken the opportunity to fix many of the issues with the 1/48 version, the bomb recess is further forward and of the right profile, the bomb crutch is correct, and the main undercarriage doors are also correct for the Skua. The engine and cowling details are very detailed for this scale, although once again there are no baffles between the cylinders, they would be hardly noticeable in this scale anyway. It's nice to see the correct Lewis machine gun for the rear cockpit. Happily, the kit has landing lights on both wings, enabling you to simply paint over the starboard one if it is for an aircraft from the later batches that only had a lamp on the port wing. So this is by far and away the best model representation of the Skua out there and also the easiest to build. Only one major and some minor errors are left. The one major flaw that has crept in is that the two backwards-facing air ducts on top of the nose of the Skua are missing completely (they are there on the 1/48th scale version). They can be easily scratch-built from some small blocks of plastic filed to shape. Of the minor flaws, the first is the inclusion of a solid bulkhead between the rear cockpit and the fuel tanks (just leave it out). Second is the position of the small undercarriage cover plate when the u/c is extended (section "B" in the diagram in the notes above), but no Skua kit gets this right and it is easily rectified with only the tiniest scratch-build. Like all Skua models, the position of the panel lines and access ports on the wing are unfortunately incorrect (shame, as they are beautifully done). However, in this scale, you can just fill them and still have a great representation of a Skua. Lastly, the shape of the flaps are wrong - but again this can be fixed by filling in and then re-scribing the ends near the ailerons.
Above, the Box art for the "Silver Wings" version of the Special Hobby 1/72 kit. This is by far the best choice for building an accurate representation of a Skua "out of the box". Well done Special Hobby!
The decal options for both the 1/48th and 1/72 Special hobby kits are the same. The three decal options for the "Norwegian Campaign" are all for aircraft lost over Norway, but they were not all lost in the attempt to sink the Scharnhorst as claimed in Special Hobby's instructions. The colour scheme illustrated for L2940, the only Skua actually lost on the raid on the Scharnhorst, is wrong, we now know that the aircraft involved in the raid had their undersurfaces painted light blue (see the Skua colour schemes page). The decals for the "Silver wings" kits are for two aircraft of 803 Squadron and one from 800 Squadron, all from 1939.
A comprehensive article on building the 1/72 scale Special Hobby Skua written by Brian Derbyshire appeared in the May 2018 edition of "Scale Aircraft Modelling".
Metallic Details - 3D printed 1/144 scale.
A tiny 3D printed 1/44 scale Skua has been released by Metallic Details in Ukraine (catalogue number MDR14454) . The fuselage and wings are moulded together. It has a vacform canopy and landing lights and photoetched bomb crutch and landing hook. There are decals for a silver Skua (L2933) and the camouflaged L2963, one of the Skuas lost in the attack on the Scharnhorst. As is to be expected in this scale and with this method of manufacture, the detail is fairly rudimentary and simplified, but it builds into a convincing replica. Details at the web page link below. The model is available in the UK via Hannants.
Link to Metallic Details website listing of its Skua model.
Some Pictures of other Skua Models
This magnificent 1/12th scale Skua (above) belongs to Øyvind Lamo. Øyvind did the colour scheme, the model was built for him by Arild Kjaeraas who runs Profiles Norway.
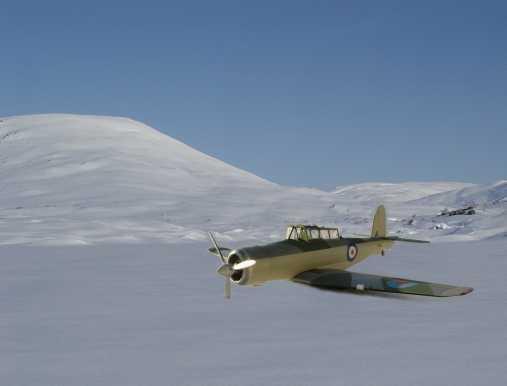
Øyvind used the model to recreate this photo taken in 1940, combining the model with a photo taken at the same spot. The original Skua L2940 which sank into the lake is now preserved in the Fleet Air Arm Museum Yeovilton. See an archived copy of his Operation Skua website for the full story.
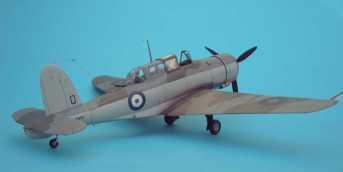
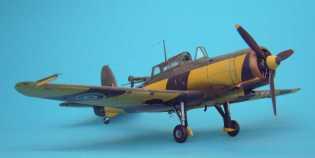
Showing what is possible with a lot of skill and attention to detail the photos above are of two Skua models built by Tony O'Toole. One is L2991 as featured on the "Skua Colours" page. The other is a Skua target tug.
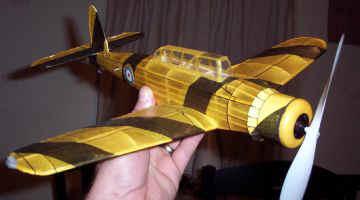
Here's a handsome rubber powered balsa model of a Skua in Target tug livery courtesy of Kevin Lehnert of the Alamo Escadrille Flying Aces Squadron #26. It is based on a kit plan from the early 1940s. "Dime Scale" models of this class compete to stay in the air longest and the added dihedral of wings makes it more stable.
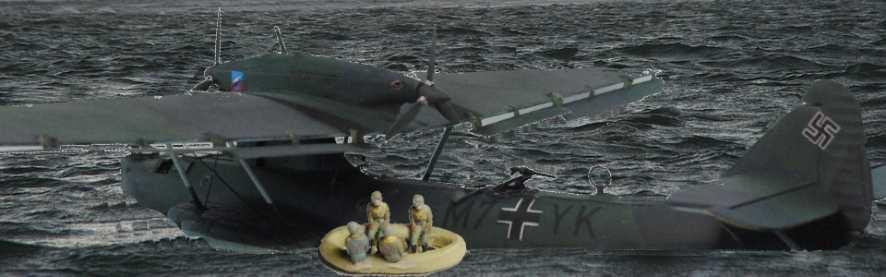
Modelling the "First Blood Incident"
The Skua was the first British aircraft to claim a confirmed aerial victory in WW2. Bernard Le Guerro has built excellent models of the Do 18 and Skua involved in the events of that day. <Click here> to read about it
.
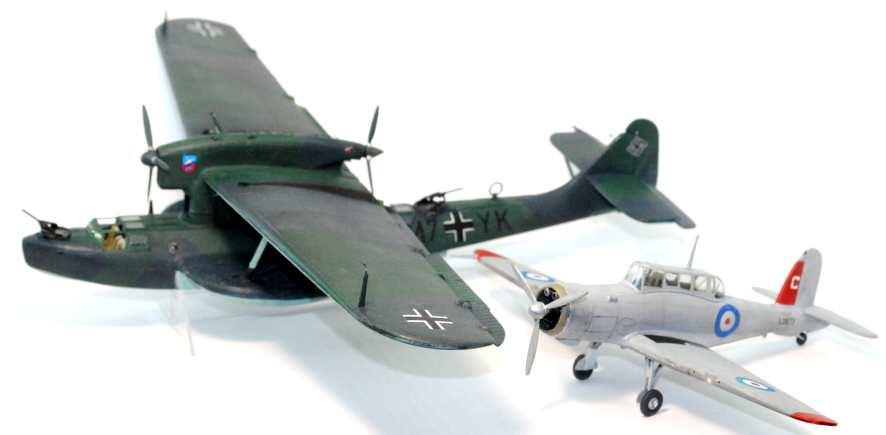
Below is a photo montage of the Do 18 model
Notes
Matthew Willis's book on the Skua and Roc was published by Mushroom Model Publications in 2007. It is an outstanding work with lots of original research, colour profiles and plans. It is the number one point of reference for anyone contemplating building a Skua or Roc.
Model Aircraft Monthly, Vol 6 Issue 10 October 2007. Has a series of articles on the Skua, including a very extensive potted history of the type by Tony O'Toole. This is illustrated by a really nice selection of photos, including colour shots of L2991 and a page full of shots of L2942. There is also an article by Tony O'Toole on building the 1/48 Special Hobby Kit.
An 8-page article on modelling the Skua by Neil Robinson was featured in the June/July 1978 edition of "Plastic Aircraft Models International" magazine (issue 22). It details how to correct the many issues with the Frog kit. It is worth looking out for on eBay if you are going to attempt a decent Skua representation from that old kit.
Brian Derbyshire's article on building the Special Hobby 1/72 Roc was in the January 2026 edition of Scale Aviation Modelling (SAM) magazine. Many thanks to Brian for mentioning this website in his article.
LINKS
This is a link to pictures of a superb scratch built Skua on another site.
Kingkit - the place to find that hard-to-find model
Kingkit - the place to find that hard-to-find model

No Ads, No Cookies, No AI Generated content.